Thursday, 25 February 2016

OpenCV C++ Code on Low Pass Median FIlter

This Opencv C++ Tutorial is about how to apply Low Pass Median Filter in OpenCV.
In the last tutorial we studied about what is a Low pass Filter ,along with one of its type i.e. Low Pass Averaging Filter.
This article describes the steps to apply Low Pass Median Filter to an Image.
 Low Pass Averaging Filter not only removes the noise but it also blurs the edges.(by blurring the image repeatedly till the noise can no longer be seen in the image)
Thus when ever the image is affected with Salt and Pepper noise it is preferable to work with Median Filtering.
The Steps to perform Median Filtering are:
1. Place the Mask Over the Image. (E.g 3*3)
2. Arrange the Pixel's value in the mask in the Increasing Order.
3. Choose the median value and place it at the centre.
4. Similarly move the mask over the image and repeat the same procedure (1-3) for the entire image.
Here is the OpenCv C++ Code for implementing Low Pass Median Filter :

//OpenCV C++ Code For Median FIltering
#include <opencv2/core/core.hpp>
#include <opencv2/highgui/highgui.hpp>
#include "iostream"
 
using namespace cv;
using namespace std;
 
int main( )
{
    Mat src1,src2;
 int a;

 //Note: Array size should be greater than the square of Size of Mask
 int b[100];
 Scalar intensity1=0;

 //Read the Image
    src1 = imread("C:\\Users\\arjun\\Desktop\\opencv-logo.png", CV_LOAD_IMAGE_GRAYSCALE);
 src2 = src1.clone();

 //If image not found 
 if (!src1.data)                                                                          
     {  
      cout << "No image data \n";  
      return -1;  
     } 

  cout<<"Enter the mask Size =";
  cin>>a;

 //for loop for counting the number of rows and columns and displaying the pixel value at each point
   for (int i = 0; i < src1.rows-a; i++) 
   { 
    for (int j = 0; j < src1.cols-a; j++) 
     { 

   Scalar intensity2;
   int x=-1;
   for (int p = 0; p<a; p++) 
       { 
    
       for (int q = 0; q<a; q++) 
        { 

      intensity1 = src1.at<uchar>(i+p,j+q); 
      b[++x] =intensity1.val[0];
    }
  
 }
   int temp;
    for (int z=0;z<a*a;z++){
   for (int y=0;y<a*a;y++){
   if(b[y]>b[y++]){
    temp=b[y++];
      b[y++]=b[y];
      b[y]=temp;
   }
  }
    }
    src2.at<uchar>(i+(a-1)/2,j+(a-1)/2)=b[((a*a)-1)/2];
     } 
   }

  //Display the original image
   namedWindow("Display Image");                
   imshow("Display Image", src1); 

  //Display the Low Pass Filtered Image image
 namedWindow("Low Pass Filtered Image");     
 imshow("Low Pass Filtered Image", src2);  
 waitKey(0);
 return 0;
}

Input Image:
OpenCV C++ Code on Low Pass Median FIlter

Output Image:
OpenCV C++ Code on Low Pass Median FIlter Output

Note:Here we have choosen mask size=5.

Wednesday, 24 February 2016

Opencv C++ Code for Low Pass Averaging Filter

This Opencv Tutorial is about Low Pass Filter.
Low Pass Filter:
As the name suggests it only pass the low frequency components of an image and removes the high frequency content from it.
Thus it is used for image smoothing and reducing the disparity among the image pixels.
Generally the Low pass filter kernel (mask) size is preferred as odd e.g 3,5,7 etc since it helps to in maintaining the symmetry.
The larger the kernel size ,more smoother the image becomes.But also as the kernel size increases ,the image becomes more blur.
Low pass filter also reduces the edges in an Image.
Types of low pass filter:
1. Low pass Averaging Filter
2. Low pass Median Filter

In this Example we have explained Low Pass Averaging Filter.
Low pass Averaging Filter:
This filter works best when there is a Gaussian noise added to the image.
As it can be seen from the low pass filter mask,it is basically the average of all the neighbouring pixels along with it.
Characteristic of Low Pass Kernel:

  • All the coefficients of the mask are positive
  • Sum of all the mask Elements should equal to 1
Working:
Consider an 6*6 image matrix:

20 20 20 20 20
20 20 20 20 20
20 20 20 20 20
10 10 10 10 10
10 10 10 10 10

As it can be seen from the image matrix there is sharp edge 10 and 20.
And the low-pass filter 3*3 mask as:
1/9 1/9 1/9
1/9 1/9 1/9
1/9 1/9 1/9

Note:
The above array is an example of one possible kernel for a low pass filter. Other filters may include more weighting for the center point, or have different smoothing in each dimension.
Now we multiply each element of the mask with that of the image pixels,add the result and obtain its average.And replace the resultant value with that of the centre pixels.We cannot work with the borders,hence they are left as it is.
This procedure is followed continuously by shifting the mask over the image starting from the top-left corner to that of the bottom-right corner.
20 20 20 20 20
20 20 20 20 20
20 20 20 20 20
10 10 10 10 10
10 10 10 10 10

20 20 20 20 20
20 20 20 20 20
20 20 20 20 20
10 10 10 10 10
10 10 10 10 10

20 20 20 20 20
20 20 20 20 20
20 20 20 20 20
10 10 10 10 10
10 10 10 10 10

20 20 20 20 20
20 20 20 20 20
20 20 20 20 20
10 10 10 10 10
10 10 10 10 10

20 20 20 20 20
20 20 20 20 20
20 20 20 20 20
10 10 10 10 10
10 10 10 10 10

20 20 20 20 20
20 20 20 20 20
20 20 20 20 20
10 10 10 10 10
10 10 10 10 10

20 20 20 20 20
20 20 20 20 20
20 20 20 20 20
10 10 10 10 10
10 10 10 10 10

20 20 20 20 20
20 20 20 20 20
20 20 20 20 20
10 10 10 10 10
10 10 10 10 10

20 20 20 20 20
20 20 20 20 20
20 20 20 20 20
10 10 10 10 10
10 10 10 10 10

The resultant matrix thus obtained is:
20 20 20 20 20
20 20 20 20 20
20 16.66 16.66 16.66 20
10 13.33 13.33 13.33 10
10 10 10 10 10

Thus ,it can be seen that the sharpness of the edge is reduced to a considerable extent and the edge between 10 and 20 is blurred
Here is the OpenCV Code for implementing low pass filter over an Image:

//Opencv C++ Tutorial on Low Pass Averaging Filter
#include <opencv2/core/core.hpp>
#include <opencv2/highgui/highgui.hpp>
#include "iostream"
 
using namespace cv;
using namespace std;
 
int main( )
{
    Mat src1,src2;
 int a;
 Scalar intensity1=0;
    src1 = imread("C:\\Users\\arjun\\Desktop\\opencv-logo.png", CV_LOAD_IMAGE_GRAYSCALE);
 src2 = src1.clone();

 //If image not found 
 if (!src1.data)                                                                          
     {  
      cout << "No image data \n";  
      return -1;  
     } 

 //Take the mask size
 //It should be less than that of size of the image
  cout<<"Enter the mask Size =";
  cin>>a;

 //for loop for counting the number of rows and columns and displaying the pixel value at each point
   for (int i = 0; i < src1.rows-a; i++) 
   { 
    for (int j = 0; j < src1.cols-a; j++) 
     { 
   Scalar intensity2;
   for (int p = 0; p<a; p++) 
       { 
    
       for (int q = 0; q<a; q++) 
        { 

      intensity1 = src1.at<uchar>(i+p,j+q); 
      intensity2.val[0] +=intensity1.val[0];
     }
  }
    src2.at<uchar>(i+(a-1)/2,j+(a-1)/2)=intensity2.val[0]/(a*a);
   } 
    }

   //Display the original image
    namedWindow("Display Image");                
    imshow("Display Image", src1);

   //Display the Low Pass Filtered Image image
  namedWindow("Low Pass Filtered Image");     
     imshow("Low Pass Filtered Image", src2);  
     waitKey(0);
     return 0;
        }

Input Image:
Opencv C++ Code for Low Pass Averaging Filter

Output Image:
Opencv C++ Code for Low Pass Averaging Filter Output

Note: Here we have Choosen Mask Size=5.

Tuesday, 23 February 2016

OpenCV C++ Code for High Pass Filter

This Opencv tutorial is about high pass filter:
High Pass Filter as the name suggests removes the low frequency content in an image and only allows high frequency content to pass through it.
Thus it sharpens the image and enhances the edges in an Image.
Hence High Pass image are used to sharpen the blurred image.
The High Pass Filter Mask is given as:

-1 -1 -1
-1 8 -1
-1 -1 -1

Consider a 6*6 Image Matrix:

20 20 20 20 20
20 20 20 20 20
20 20 20 20 20
10 10 10 10 10
10 10 10 10 10
10 10 10 10 10

The modified image matrix after multiplying the High Pass Mask would become:
20 20 20 20 20
20 0 0 0 20
20 5.5 5.5 5.5 5.5
10 -20 -20 -20 -20
10 0 0 0 0
10 10 10 10 10
Note: All the coefficients of the High Pass Filters are negative except the Center one, since we need to remove surrounding pixels which are of same intensity.And sum of the Coefficients of High Pass Mask is Zero. WE use the scaling factor of 1/9 so that the pixel values ≤ 255.
Also high pass filter not only enhances the edges but also noise in an image.Thus it is not prefered for images which are having high noise in it.
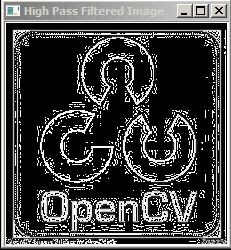
Here is the Opencv Code for implementing High Pass Filter over an Image.

#include <opencv2/core/core.hpp>
#include <opencv2/highgui/highgui.hpp>
#include "iostream"
 
using namespace cv;
using namespace std;
 
int main( )
{
    Mat src1,src2;
    int a;
    Scalar intensity1=0;
    src1 = imread("C:\\Users\\arjun\\Desktop\\opencv-logo.jpg", CV_LOAD_IMAGE_GRAYSCALE);
    src2 = src1.clone();

 //If image not found 
 if (!src1.data)                                                                          
  {  
    cout << "No image data \n";  
    return -1;  
  } 

 //Take the Mask Size less thna the size of an Image
  cout<<"Enter the mask Size =";
  cin>>a;

   for (int i = 0; i < src1.rows-a; i++) 
   { for (int j = 0; j < src1.cols-a; j++) 
     { 
    Scalar intensity2=0;
       for (int p = 0; p<a; p++) 
       { for (int q = 0; q<a; q++) 
         { 
          intensity1 = src1.at<uchar>(i+p,j+q); 
          if( (p==(a-1)/2) && (q==(a-1)/2))
            {
              intensity2.val[0] +=(a*a-1)*intensity1.val[0];
            }
          else
            {
               intensity2.val[0] +=(-1)*intensity1.val[0];
            }
          }
       }
         src2.at<uchar>(i+(a-1)/2,j+(a-1)/2)=intensity2.val[0]/(a*a);
    } 
  }

   //Display the original image
    namedWindow("Display Image");                
    imshow("Display Image", src1);

   //Display the High Pass Filtered Image image
    namedWindow("High Pass Filtered Image");     
    imshow("High Pass Filtered Image", src2);  
    waitKey(0);
    return 0;
}

Some of the Other High Pass masks are:

0 -1 0
-1 4 -1
0 -1 0


-1 -2 -1
-2 12 -2
-1 -2 -1

Note: The only criteria which every high pass mask should satisfy is that sum of its coefficients value should be equal to zero.Depending upon the requirement we can design an high pass mask and assign the coefficient values to it.For eg. a value of 4 to the center pixel denotes that more importance is given to that image pixel than to its borders. Input Image:

OpenCV C++ Code for High Pass Filter

Output Image:
OpenCV C++ Code for High Pass Filter Output

Here we have taken Mask Size=3