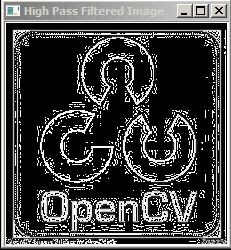
This Opencv tutorial is about high pass filter:
High Pass Filter as the name suggests removes the low frequency content in an image and only allows high frequency content to pass through it.
Thus it sharpens the image and enhances the edges in an Image.
Hence High Pass image are used to sharpen the blurred image.
The High Pass Filter Mask is given as:
Consider a 6*6 Image Matrix:
The modified image matrix after multiplying the High Pass Mask would become:
Note: All the coefficients of the High Pass Filters are negative except the Center one, since we need to remove surrounding pixels which are of same intensity.And sum of the Coefficients of High Pass Mask is Zero.
WE use the scaling factor of 1/9 so that the pixel values ≤ 255.
Also high pass filter not only enhances the edges but also noise in an image.Thus it is not prefered for images which are having high noise in it.
Here is the Opencv Code for implementing High Pass Filter over an Image.
Some of the Other High Pass masks are:
Note: The only criteria which every high pass mask should satisfy is that sum of its coefficients value should be equal to zero.Depending upon the requirement we can design an high pass mask and assign the coefficient values to it.For eg. a value of 4 to the center pixel denotes that more importance is given to that image pixel than to its borders. Input Image:
Output Image:
Here we have taken Mask Size=3
High Pass Filter as the name suggests removes the low frequency content in an image and only allows high frequency content to pass through it.
Thus it sharpens the image and enhances the edges in an Image.
Hence High Pass image are used to sharpen the blurred image.
The High Pass Filter Mask is given as:
| -1 | -1 | -1 |
| -1 | 8 | -1 |
| -1 | -1 | -1 |
Consider a 6*6 Image Matrix:
| 20 | 20 | 20 | 20 | 20 |
| 20 | 20 | 20 | 20 | 20 |
| 20 | 20 | 20 | 20 | 20 |
| 10 | 10 | 10 | 10 | 10 |
| 10 | 10 | 10 | 10 | 10 |
| 10 | 10 | 10 | 10 | 10 |
The modified image matrix after multiplying the High Pass Mask would become:
| 20 | 20 | 20 | 20 | 20 |
| 20 | 0 | 0 | 0 | 20 |
| 20 | 5.5 | 5.5 | 5.5 | 5.5 |
| 10 | -20 | -20 | -20 | -20 |
| 10 | 0 | 0 | 0 | 0 |
| 10 | 10 | 10 | 10 | 10 |
Also high pass filter not only enhances the edges but also noise in an image.Thus it is not prefered for images which are having high noise in it.
Here is the Opencv Code for implementing High Pass Filter over an Image.
#include <opencv2/core/core.hpp>
#include <opencv2/highgui/highgui.hpp>
#include "iostream"

using namespace cv;
using namespace std;

int main( )
{
    Mat src1,src2;
    int a;
    Scalar intensity1=0;
    src1 = imread("C:\\Users\\arjun\\Desktop\\opencv-logo.jpg", CV_LOAD_IMAGE_GRAYSCALE);
    src2 = src1.clone();

 //If image not found
 if (!src1.data)
  {
    cout << "No image data \n";
    return -1;
  }

 //Take the Mask Size less thna the size of an Image
  cout<<"Enter the mask Size =";
  cin>>a;

   for (int i = 0; i < src1.rows-a; i++)
   { for (int j = 0; j < src1.cols-a; j++)
     {
    Scalar intensity2=0;
       for (int p = 0; p<a; p++)
       { for (int q = 0; q<a; q++)
         {
          intensity1 = src1.at<uchar>(i+p,j+q);
          if( (p==(a-1)/2) && (q==(a-1)/2))
            {
              intensity2.val[0] +=(a*a-1)*intensity1.val[0];
            }
          else
            {
               intensity2.val[0] +=(-1)*intensity1.val[0];
            }
          }
       }
         src2.at<uchar>(i+(a-1)/2,j+(a-1)/2)=intensity2.val[0]/(a*a);
    }
  }

   //Display the original image
    namedWindow("Display Image");
    imshow("Display Image", src1);

   //Display the High Pass Filtered Image image
    namedWindow("High Pass Filtered Image");
    imshow("High Pass Filtered Image", src2);
    waitKey(0);
    return 0;
}
Some of the Other High Pass masks are:
| 0 | -1 | 0 |
| -1 | 4 | -1 |
| 0 | -1 | 0 |
| -1 | -2 | -1 |
| -2 | 12 | -2 |
| -1 | -2 | -1 |
Note: The only criteria which every high pass mask should satisfy is that sum of its coefficients value should be equal to zero.Depending upon the requirement we can design an high pass mask and assign the coefficient values to it.For eg. a value of 4 to the center pixel denotes that more importance is given to that image pixel than to its borders. Input Image:
Output Image:
Here we have taken Mask Size=3


hello there author its showing no image data
ReplyDeleteEven I have provided the location of file
Can you share your code?
Delete