Wednesday 20 April 2016

Opencv C++ Code For Solving Maze


This OpenCV C++ Tutorial is about solving mazes using Simple Morphological transformation.
The script works for only perfect mazes, i.e the maze which has one and only one unique solution,no subsections,no circular area and no open areas.
These kind of perfect mazes can be generated using online maze generation tools.
Lets take this simple maze as test image:
The steps for Solving Perfect Mazes are:
1. Load the Source Image.
2. Convert the given image into binary image.
3. Extract Counters from it.
Now the External Counter for a perfect maze is 2(because the perfect maze has only 2 walls).
So if the given Maze is perfect,it would have 2 External Counters,then proceed with the logic below
4. So select any one wall, and dilate and erode the ways by the same amount of pixels.
5.Subtract the eroded image from the dilated image to get the final output i.e the solution of the maze.
//Opencv C++ Program to solve mazes using mathematical morphology
#include <opencv2/highgui/highgui.hpp>
#include <opencv2/imgproc/imgproc.hpp>
#include <cmath>
#include <iostream>

using namespace cv;
using namespace std;

int main()
{
    Mat src = imread("C:\\Users\\arjun\\Desktop\\opencv-maze-generator.png");
    if( !src.data ) { printf("Error loading src \n"); return -1;}

 //Convert the given image into Binary Image
    Mat bw;
    cvtColor(src, bw, CV_BGR2GRAY);
    threshold(bw, bw, 10, 255, CV_THRESH_BINARY_INV);

 //Detect Contours in an Image
    vector<std::vector<cv::Point> > contours;
    findContours(bw, contours, CV_RETR_EXTERNAL, CV_CHAIN_APPROX_NONE);

    if (contours.size() != 2)
    {
        // "Perfect maze" should have 2 walls
        std::cout << "This is not a 'perfect maze' with just 2 walls!" << std::endl;
        return -1;
    }

    Mat path = Mat::zeros(src.size(), CV_8UC1);
    drawContours(path, contours, 0, CV_RGB(255,255,255), CV_FILLED);
 
 //Dilate the Image
    Mat kernel = Mat::ones(21, 21, CV_8UC1); 
    dilate(path, path, kernel);

 //Erode the Image
    Mat path_erode;
    erode(path, path_erode, kernel);

 //Subtract Eroded Image from the Dilate One
    absdiff(path, path_erode, path);

 //Draw the Path by Red Color
    vector<Mat> channels;
    split(src, channels);
    channels[0] &= ~path;
    channels[1] &= ~path;
    channels[2] |= path;

    Mat dst;
    merge(channels, dst);
    imshow("solution", dst);
    waitKey(0);

    return 0;
}

1. Input :


2. After converting the given Image to Binary :


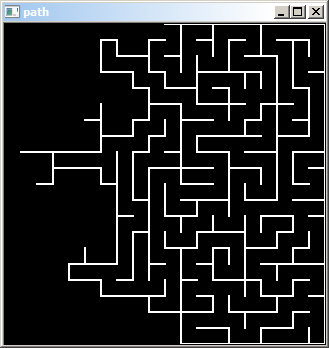
3. After detecting Contours:
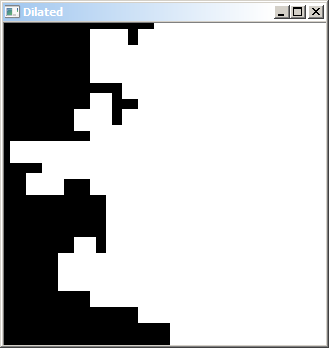

4. After Dilation:


5. After Appying Erosion:


6. After Subtracting Dilated Image from the Eroded:


7. Tracing the path with red Color(Final Output):

Thursday 14 April 2016

How to Put/Overlay/Place/Copy Small Image over the Bigger One

This Opencv C++ tutorial is about placing a smaller image over the Bigger one.
Now, In order to overlay one image over the other we need to get the point where we should place the Smaller Image.
And also we need to create a Region of Interest(ROI) on the bigger image.
Thus the Logic of the Code would be:
1. Read the Bigger Image
2. Read the smaller Image
3. Create a Region of Interest over the bigger Image
    cv::Mat small_image;
    cv::Mat big_image;
    ...
   //Somehow fill small_image and big_image with your data
   ...
  small_image.copyTo(big_image(cv::Rect(x,y,small_image.cols, small_image.rows)));
  Refer the Opencv C++ Code below:

//Copying One Image/Overlaying one image over the other
#include <opencv2/core/core.hpp>
#include <opencv2/highgui/highgui.hpp>
#include <iostream>

using namespace cv;
using namespace std;

int main()
{
 Mat src1,src2;
 src1=imread("C:\\Users\\arjun\\Desktop\\image1.jpg",1);
 src2=imread("C:\\Users\\arjun\\Desktop\\opencv-logo.png",1);
 if(!src1.data)
 { cout<<"Error loading src1"<<endl; return -1;}
 if(!src2.data)
 { cout<<"Error loading src2"<<endl; return -1;}
 if(src1.size <= src2.size)
 { cout<<"Error First Image should be larger than Second Image"<<endl;}
 src2.copyTo(src1(cv::Rect(10,10,src2.cols, src2.rows)));

 namedWindow("Image Window src1",CV_WINDOW_AUTOSIZE);
 imshow("Image Window src1",src1);

 waitKey(0);
 return(0);
}

Input Image1(Bigger Image):

Input Image2(Smaller Image):

Output Image(Overlayed Image):

Note:-
Here we have copied Smaller Image (opencv-logo) over Bigger Image (image1).

Sunday 10 April 2016

OpenCV C++ Code for putting Text on an Image

This Opencv C++ Tutorial is about putting Text on an Image

In Opencv we can put Text on an Image by using putText() function.
Syntax:
C++: void putText(Mat& img, const string& text, Point org, int fontFace, double fontScale, Scalar color, int thickness=1, int lineType=8, bool bottomLeftOrigin=false )
Parameters:
img – Image.
text – Text string to be drawn.
org – Bottom-left corner of the text string in the image.
font – CvFont structure initialized using InitFont().
fontFace – Font type. One of FONT_HERSHEY_SIMPLEX, FONT_HERSHEY_PLAIN, FONT_HERSHEY_DUPLEX, FONT_HERSHEY_COMPLEX, FONT_HERSHEY_TRIPLEX, FONT_HERSHEY_COMPLEX_SMALL, FONT_HERSHEY_SCRIPT_SIMPLEX, or FONT_HERSHEY_SCRIPT_COMPLEX, where each of the font ID’s can be combined with FONT_ITALIC to get the slanted letters.
fontScale – Font scale factor that is multiplied by the font-specific base size.
color – Text color.
thickness – Thickness of the lines used to draw a text.
lineType – Line type. See the line for details.
bottomLeftOrigin – When true, the image data origin is at the bottom-left corner. Otherwise, it is at the top-left corner.

//Opencv c++ code for Overlaying a Text on an Image
//Opencv c++ code for Putting Text on an Image
#include <opencv2/core/core.hpp>
#include <opencv2/highgui/highgui.hpp>
#include <iostream>

using namespace cv;
using namespace std;

int main()
{
 Mat image;
 image=imread("C:\\Users\\arjun\\Desktop\\opencv-logo.png",1);

 if(!image.data)
 { printf("Error loading image \n"); return -1;}

    putText(image, "opencv-hub", Point(5,100), FONT_HERSHEY_DUPLEX, 1, Scalar(0,143,143), 2);

 namedWindow("Image Window image",CV_WINDOW_AUTOSIZE);
 imshow("Image Window image",image);

 waitKey(0);
 return(0);
}


Input Image:-
OpenCV-logo

Output Image:-
OpenCV C++ Code putText

Note:-Here we have put the text "opencv"  (seen in purple color) over the image.

Thursday 7 April 2016

Opencv C++ Code For Detecting Lines Inclined at minus 45 degree

This OpenCV C++ Tutorial is about Slant Line Detection i.e. detecting lines inclined at minus 45 degrees
To detect slant lines inclined at -45 degress, we use the mask:
2-1-1
-12-1
-1-12

Thus sliding this mask over an Image we can detect Lines inclined at -45 degrees.
Here is the Opencv C++ Example of Slant Line (lines/edges at 45 degrees)Detection below:

Here is the Opencv C++ Example of Slant Line (lines/edges at 45 degrees)Detection below:
//Opencv C++ Code for detecting line inclined at minus 45 degree
#include <opencv2/core/core.hpp>
#include <opencv2/highgui/highgui.hpp>
#include "iostream"
 
using namespace cv;
using namespace std;
 
int main( )
{
    Mat src1,src2;
 int a;
 Scalar intensity1=0;
    src1 = imread("C:\\Users\\arjun\\Desktop\\opencv-test.jpg", CV_LOAD_IMAGE_GRAYSCALE);
 src2 = src1.clone();

 //If image not found 
 if (!src1.data)                                                                          
     {  
      cout << "No image data \n";  
      return -1;  
     } 

 //Take the Size of Mask
  cout<<"Enter the mask Size =";
  cin>>a;

 //for loop for counting the number of rows and columns and displaying the pixel value at each point
   for (int i = 0; i < src1.rows-a; i++) { 
    for (int j = 0; j < src1.cols-a; j++) { 
   Scalar intensity2=0;
   for (int p = 0; p<a; p++) { 
    for (int q = 0; q<a; q++) { 
    intensity1 = src1.at<uchar>(i+p,j+q); 
       if (p==q)
   {
    intensity2.val[0] +=(a-1)*intensity1.val[0];
   }
       else
   {
      intensity2.val[0] +=(-1)*intensity1.val[0];
   }
   
     }
  
  }
      src2.at<uchar>(i+(a-1)/2,j+(a-1)/2)=intensity2.val[0]/(a*a);
  } 
    
  }

  //Display the original image
  namedWindow("Display Image");                
  imshow("Display Image", src1);  
  
  //Display the Low Pass Filtered Image image
  namedWindow("Low Pass Filtered Image");     
  imshow("Low Pass Filtered Image", src2);  
  imwrite("C:\\Users\\arjun\\Desktop\\opencv-slant-line.jpg",src2);
  waitKey(0);
  return 0;
}

Input:
OpenCV C++ Line Detection Input
Output:
OpenCV C++ Slant Line Detection Output

Wednesday 6 April 2016

Opencv C++ Code For Detecting Lines Inclined at plus 45 degree

This OpenCV C++ Tutorial is about Slant Line Detection i.e. detecting lines inclined at plus 45 degrees
To detect slant lines inclined at +45 degress, we use the mask:
-1-12
-12-1
2-1-1

Thus sliding this mask over an Image we can detect Lines inclined at +45 degrees.
Here is the Opencv C++ Example of Slant Line (lines/edges at 45 degrees)Detection below:

//Opencv C++ Code for detecting line inclined at 45 degree
#include <opencv2/core/core.hpp>
#include <opencv2/highgui/highgui.hpp>
#include "iostream"
 
using namespace cv;
using namespace std;
 
int main( )
{
    Mat src1,src2;
 int a;
 Scalar intensity1=0;
    src1 = imread("C:\\Users\\arjun\\Desktop\\opencv-test.jpg", CV_LOAD_IMAGE_GRAYSCALE);
 src2 = src1.clone();

 //If image not found 
 if (!src1.data)                                                                          
     {  
      cout << "No image data \n";  
      return -1;  
     } 

  cout<<"Enter the mask Size =";
  cin>>a;

 //for loop for counting the number of rows and columns and displaying the pixel value at each point
   for (int i = 0; i < src1.rows-a; i++) { 
    for (int j = 0; j < src1.cols-a; j++) { 
   Scalar intensity2=0;
   for (int p = 0; p<a; p++) { 
     for (int q = 0; q<a; q++){ 
    intensity1 = src1.at<uchar>(i+p,j+q); 
    if( (p+q==(a-1)))
      {
    intensity2.val[0] +=(a-1)*intensity1.val[0];
      }
       else
      {
    intensity2.val[0] +=(-1)*intensity1.val[0];
      }
   
     }
  
  }
        src2.at<uchar>(i+(a-1)/2,j+(a-1)/2)=intensity2.val[0]/(a*a);
   } 
    
  }
 //Display the original image
 namedWindow("Display Image");                
 imshow("Display Image", src1); 

 //Display the Low Pass Filtered Image image
    namedWindow("Line Detection Image");     
 imshow("Line Detection Image", src2);  
    imwrite("C:\\Users\\arjun\\Desktop\\opencv-slant-line.jpg",src2);
 waitKey(0);
 return 0;
 }

Input:

OpenCV C++ Line Detection Input
Output:

OpenCV C++ Slant Line Detection Output

Monday 4 April 2016

Opencv C++ Code For Vertical Line Detection

This OpenCV C++ Tutorial is about Vertical Line Detection i.e. How to Detect Vertical Edges or Lines in an Image
To detect Vertical Lines in an Image we use the mask:
-1-1-1
222
-1-1-1

Thus sliding this mask over an Image we can detect vertical Lines.
Note:- Sum of the Elements of the Mask is Zero
Here is the Opencv C++ Code with Example for Vertical Line/Edge Detection below:

//Opencv C++ Example for Detecting Vertical Lines
#include <opencv2/core/core.hpp>
#include <opencv2/highgui/highgui.hpp>
#include "iostream"
 
using namespace cv;
using namespace std;
 
int main( )
{
    Mat src1,src2;
 int a;
 Scalar intensity1=0;
    src1 = imread("C:\\Users\\arjun\\Desktop\\opencv-test.jpg", CV_LOAD_IMAGE_GRAYSCALE);
 //If image not found 
 if (!src1.data)                                                                          
     { cout << "No image data \n";  return -1; } 

 src2 = src1.clone();
 cout<<"Enter the mask Size(Preferably Enter Odd Number) =";
 cin>>a;

 //for loop for counting the number of rows and columns and displaying the pixel value at each point
   for (int i = 0; i < src1.rows-a; i++) { 
   for (int j = 0; j < src1.cols-a; j++) { 
  Scalar intensity2=0;
  for (int p = 0; p<a; p++) { 
  for (int q = 0; q<a; q++) { 
   intensity1 = src1.at<uchar>(i+p,j+q); 
   if( (q==(a-1)/2))
   {
    intensity2.val[0] +=(a-1)*intensity1.val[0];
   }
   else
   {
      intensity2.val[0] +=(-1)*intensity1.val[0];
   }
    } 
  }
    src2.at<uchar>(i+(a-1)/2,j+(a-1)/2)=intensity2.val[0]/(a*a);
 } 
    }
  //Display the original image
    namedWindow("Display Image");                
    imshow("Display Image", src1); 

   //Display the Low Pass Filtered Image image
    namedWindow("Low Pass Filtered Image");     
    imshow("Low Pass Filtered Image", src2);
    imwrite("C:\\Users\\arjun\\Desktop\\opencv-example-vertical-edges.png",src2);
    waitKey(0);
    return 0;
    }
Input :

OpenCV C++ Vertical Line Detection Input

Output:

OpenCV C++Vertical Line Detection Output


For Horizontal Line Detection Refer:
Opencv C++ Code : Detecting Horizontal Line in an Image.