Wednesday, 24 June 2015

Histogram Equalisation by converting an RGB image into a GrayScale Image/ Histogram Equalisation of Grayscale Image

This opencv tutorial is about drawing histogram of a grayscale image.

What is a Image Histogram?
Histogram of an image represents the relative frequency of occurrence of various tonal values of an image. In other words it is a graphical representation of the intensity distribution of an image.
Simply said, it plots the number of times (frequency) each intensity values(pixel values) occurs in image.


E.g.: Consider the following matrix of an image :-
1
4
7
6
2
5
5
7
3
5
3
3
7
5
6
3
4
7
1
5
4
2
2
3

Here the depth of the image is 8.Since the highest value of pixel in this image is 7

Note:-Depth of n represents that the range of pixel values is from 0 to n-1

Histogram shows the pattern of distribution of pixel in an Image.
The above image contains 2 pixels of intensity 1, 3 pixels of intensity 2, 5 pixels of intensity 3 and so on.

This can be tabulated as:
Pixel Value
No. of Pixels
0
0
1
2
2
3
3
5
4
3
5
5
6
2
7
4
The following graph shows the histogram of the above image:-
opencv image histogram tutorial

What is histogram equalization?
Histogram equalization is defined as equalizing the intensity distribution of an image or flattening the intensity distribution. It helps in enhancing the contrast of the image.

The graph of the equalized histogram looks like this:
opencv equalized histogram example

Here is the opencv histogram equalization code :
#include "opencv2/highgui/highgui.hpp"
#include "opencv2/imgproc/imgproc.hpp"
#include <iostream>
#include <stdio.h>

using namespace cv;
using namespace std;

int mainundefined)
{
  //Declare the source and destination images as well as the windows names:
  Mat src, dst;
  char* source_window = "Source image";
  char* equalized_window = "Equalized Image";

  // Load image
  src = imreadundefined "C:\\Users\\arjun\\Desktop\\input.jpg", 1 );

  ifundefined !src.data )
    { 
     cout<<"No image Found "<<endl;
     return -1;
    }

  // Convert to grayscale
  cvtColorundefined src, src, CV_BGR2GRAY );

  // Apply Histogram Equalization
  equalizeHistundefined src, dst );

  // Display results
  namedWindowundefined source_window, CV_WINDOW_AUTOSIZE );
  namedWindowundefined equalized_window, CV_WINDOW_AUTOSIZE );

  imshowundefined source_window, src );
  imshowundefined equalized_window, dst );

  // Wait until user exits the program
  waitKeyundefined0);

  return 0;
}

Before Histogram Equalization Image:
opencv :before histogram equalisation

After Histogram Equalization Image:
opencv : after histogram equalisation

Frequency distribution table of before histogram equalisation image:
opencv frequency distribution table before histogram equalisation

Frequency distribution table of histogram equalized image:
opencv frequency distribution table after histogram equalisation

Note: The difference between two frequency distribution table and the corresponding image before histogram equalization to that after histogram equalization 

Thursday, 11 June 2015

Drawing a circle by dynamically taking the value of its centre and radius from the user

This opencv tutorial is about drawing a circle by dynamically taking radius and centre values from the user.

Drawing a Circle(Opencv):
Syntax:
void circle(Mat& img, Point center, int radius, const Scalar& color, int thickness=1, int lineType=8, int shift=0)

Parameters:
img – Image where the circle is drawn.
center – Center of the circle.
radius – Radius of the circle.
color – Circle color.
thickness – Thickness of the circle outline, if positive. Negative thickness means that a filled circle is to be drawn.
lineType – Type of the circle boundary. See the line() description.
shift – Number of fractional bits in the coordinates of the center and in the radius value.
The function circle draws a simple or filled circle with a given center and radius.

Note: To draw a filled circle in Opencv ,take the value of line type as Negative (e.g -2).

Here is the opencv code below:
#include <opencv2/core/core.hpp>
#include <opencv2/highgui/highgui.hpp>
using namespace cv;
 
int main( )
{    
  // Create black empty images
  Mat image = Mat::zeros( 400, 400, CV_8UC3 );
   
  // Draw a circle 
  circle( image, Point( 200, 200 ), 32.0, Scalar( 0, 0, 255 ), 1, 8 );
  imshow("Image",image);
 
  waitKey( 0 );
  return(0);
}
Drawing Concentric  Circles(opencv):
Here is the opencv code below for drawing concentric circles:
#include <opencv2/core/core.hpp>
#include <opencv2/highgui/highgui.hpp>
using namespace cv;
 
int main( )
{    
  // Create black empty images
  Mat image = Mat::zeros( 400, 400, CV_8UC3 );
   
  // Draw a circle 
  for(int i=0; i<200;i=i+30)
  {
  circle( image, Point( 200, 200 ), i, Scalar( 0, 0, 255 ), 1, 8 );
  imshow("Image",image);
 
  waitKey( 1000 );
  }
  return(0);
}
Drawing circle by taking the value of radius from the user:
Here is the code below for drawing concentric circles by dynamically taking values from the user:
#include <opencv2/core/core.hpp>
#include <opencv2/highgui/highgui.hpp>
#include <iostream>
using namespace cv;
using namespace std;

int main( )
{    
  // Create black empty images
  /*It basically defines the size of the window where circle would be drawn*/
  Mat image = Mat::zeros( 400, 400, CV_8UC3 );
  int i,x,y; 
  // Draw a circle 
  while(true)
  {
  cout<<"Enter the co-ordinates of the centre"<<endl;
  //Get value of centre from the user it should be 0<x<400 and 0<y<400
  //Bcoz size of window is (400,400)
  cin>>x>>y;
  //Display the co-ordinate of the centre in the form (x,y)
  cout<<"Co-ordinates of the centre is ("<<x<<","<<y<<")"<<endl;
  cout <<"Enter the value of radius"<<endl;
   //Take the value of centre from the user
  cin >>i;
  //Function for drawing the circle
  circle( image, Point( x, y ), i, Scalar( 0, 0, 255 ), 1, 8 );
  imshow("Image",image);
  waitKey( 1000 );
  }
  return(0);
}

Wednesday, 10 June 2015

Extracting text/Recognising text (alphabets,numbers) from an Image using OpenCv and Tesseract-OCR libraries

This Opencv C++ tutorial is about extracting text from an image using Tesseract OCR libraries.


To extract text from an image or to recognise text from an image we need to use Tesseract, which is probably the most accurate OCR engine available.Along with Leptonica image processing it can recognize a wide variety of image formats and extract text details from them an convert it into over 60 languages.
Thus it has immense application likes:
Extracting text from a newspaper/magazine and and digitizing the document thus can be added to further processing like converting it to speech or puting it on web for surfing etc.

Here is the link of downloading tesseract:
http://sourceforge.net/projects/tesseract-ocr/

So steps to configure tesseract with visual studio are:
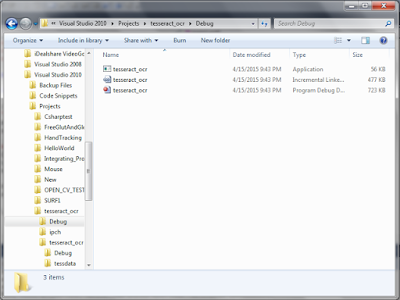
  1. Download tesseract library and extract it to a directory( e.g in my it is case D:\)
  2. Open Visual Studio 2010---New Project--- Visual C++---Windows Console Application

  3. Name the file(e.g Tesseract_OCR) -- Click OK
  4. Click Next---Tick on Empty Project---Finish
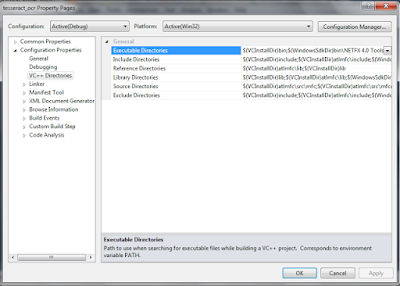
  5. Right Click on Tesseract_ocr and Click Properties.

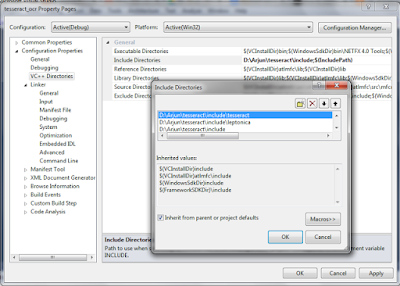
  6. Click VC++ directory-- Include Directory---Add
    • D:\Tesseract\include
    • D:\Tesseract\include\tesseract
    • D:\Tesseract\include\leptonica
    Click OK--Apply


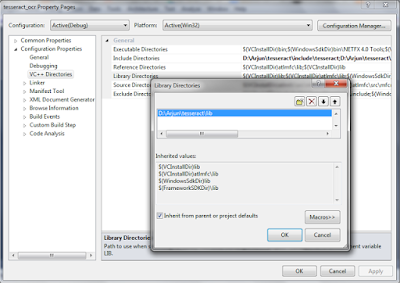
  7. Click Library Directories---Add

  8. (D:\Arjun\Tesseract\lib)

    Click OK--Apply
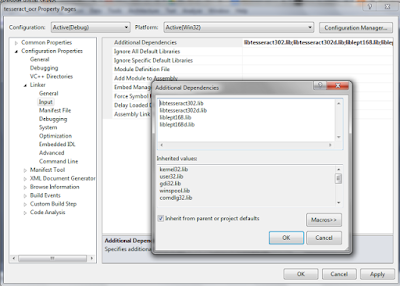
  9. Click Linker--Input--Additional Dependencies

  10. Add this there :
    • libtesseract302.lib
    • libtesseract302d.lib
    • liblept168.lib
    • liblept168d.lib

    Click Ok--Apply
  11. Copy liblept168.dll, liblept168d.dll, libtesseract302.dll and libtesseract302.dll from D:\Arjun\Tesseract\ into your project folder (Optional)


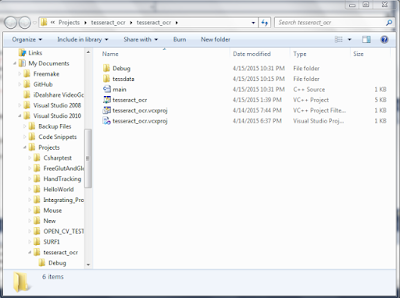
  12. Copy Tessdata from D:\Arjun\Tesseract-OCR into your project directory.

  13. Note: If you miss copying the Tessdata folder into your project directory you will get an error as shown below:

    Error opening data file ./tessdata/eng.traineddata
    Please make sure the TESSDATA_PREFIX environment variable is set to the parent directory of your "tessdata" directory.
    Failed loading language 'eng'
    Tesseract couldn't load any languages!
    File name:

  14. Code to check whether its working:


//Opencv C++ Code with example for extracting text from an Image.
//We have used Tesseract OCR Libraries along with OpenCV
#include<baseapi.h>
#include <allheaders.h>
#include <iostream>
using namespace std;

int main(void){

    tesseract::TessBaseAPI api;
    api.Init("", "eng", tesseract::OEM_DEFAULT);
    api.SetPageSegMode(static_cast(3));
    api.SetOutputName("out");

    cout<<"File name:";
    char image[256];
    cin>>image;
    PIX   *pixs = pixRead(image);

    STRING text_out;
    api.ProcessPages(image, NULL, 0, &text_out);

    cout<<text_out.string();

}

Input :
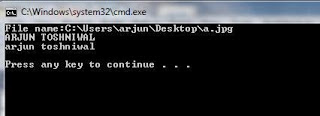
Output:


Another Code:
#include "opencv2/highgui/highgui.hpp"
#include "opencv2/imgproc/imgproc.hpp"
#include "tesseract/baseapi.h"
#include "iostream"

using namespace cv;
using namespace std;

int main()
{
    // Load image
    Mat im = imread("C:\\Users\\arjun\\Desktop\\a.jpg");
    if (im.empty())
    {
        cout<<"Cannot open source image!" <<endl;
        return -1;
    }

    Mat gray;
    cvtColor(im, gray, CV_BGR2GRAY);
    // ...other image pre-processing here...

    // Pass it to Tesseract API
    tesseract::TessBaseAPI tess;
    tess.Init(NULL, "eng", tesseract::OEM_DEFAULT);
    tess.SetPageSegMode(tesseract::PSM_SINGLE_BLOCK);
    tess.SetImage((uchar*)gray.data, gray.cols, gray.rows, 1, gray.cols);

    // Get the text
    char* out = tess.GetUTF8Text();
    cout << out <<endl;

    return 0;
}

Tuesday, 9 June 2015

Changing or Modifying the pixel value at a particular point of an image using opencv

This tutorial is about how to change the pixel value of an image at a particular co-ordinate:


Here is the code below:

/*Displaying the Pixel value of the whole Image using Loops*/

#include <opencv2/core/core.hpp>  
#include <opencv2/highgui/highgui.hpp>  
#include <iostream> 

  using namespace std;  
  using namespace cv;  

int main() 
  {  
    Mat image1,image2; 
 //Reading the color image 
    image1 = imread("C:\\Users\\arjun\\Desktop\\image003.png", CV_LOAD_IMAGE_COLOR);  

 //If image1 not found 
 if (!image1.data)                                                                          
    {  
     cout << "No image data \n";  
     return -1;  
    } 

 namedWindow("Original Image");               //Display the original image
    imshow("Original Image", image1);

 //Changing the pixel value at just a particular point(100,200)
  Vec3b color = image1.at<Vec3b>(Point(100,200));
      color.val[0] = 100;
      color.val[1] = 0;
      color.val[2] = 0;
 image1.at<Vec3b>(Point(100,200)) = color;

   //Save the modified image
      imwrite("C:\\Users\\arjun\\Desktop\\mod_image.png",image1);
      //Reading the modifed image
      image2 = imread("C:\\Users\\arjun\\Desktop\\mod_image.png", CV_LOAD_IMAGE_COLOR);  

   //If image2 not found 
       if (!image2.data)                                                                          
       {  
        cout << "No image data \n";  
        return -1;  
       } 

    namedWindow("Modified Image");               //Display the modified image
    imshow("Modified Image", image2); 
 waitKey(0);
 return 0;
   }


Link of the Code:

Original Image:
modifying-pixel-value-at-a-point-original-image-opecv

Modified Image:
changing-pixel-value-at-a-point-modified-image-opencv

Note:
We can see the difference by subtracting the two images:
The code for subtracting the two images is shown below:
Here i have stored the original image in the variable called 'image'.

/*Displaying the Pixel value of the whole Image using Loops*/
#include <opencv2/core/core.hpp>  
#include <opencv2/highgui/highgui.hpp>  
#include <iostream> 

  using namespace std;  
  using namespace cv;  

int main() 
  {  
    Mat image,image1,image2; 
 //Reading the color image 
 image = imread("C:\\Users\\arjun\\Desktop\\image003.png", CV_LOAD_IMAGE_COLOR);  
    image1 = imread("C:\\Users\\arjun\\Desktop\\image003.png", CV_LOAD_IMAGE_COLOR);  

 //If image1 not found 
 if (!image1.data)                                                                          
    {  
     cout << "No image data \n";  
     return -1;  
    } 

 namedWindow("Original Image");               //Display the original image
    imshow("Original Image", image1);

 //Changing the pixel value at just a particular point(100,200)
  Vec3b color = image1.at<Vec3b>(Point(100,200));
      color.val[0] = 100;
      color.val[1] = 0;
      color.val[2] = 0;
 image1.at<Vec3b>(Point(100,200)) = color;

   //Subtracting the two image
 image1=image-image1;
 //Save the modified image
    imwrite("C:\\Users\\arjun\\Desktop\\mod_image.png",image1);
    //Reading the modifed image
    image2 = imread("C:\\Users\\arjun\\Desktop\\mod_image.png", CV_LOAD_IMAGE_COLOR);  

   //If image2 not found 
       if (!image2.data)                                                                          
       {  cout << "No image data \n";  
         return -1; } 

    namedWindow("Modified Image");               //Display the modified image
    imshow("Modified Image", image2); 
 waitKey(0);
 return 0;
   } 
Link of the Code:
https://drive.google.com/file/d/0B9Mnn6QWcwVnTTd1OEhVUEF2S3M/view?usp=sharing


Original Image:

Modified Image:
Notice the white dot in the black image.

Monday, 8 June 2015

Accessing pixel value of an image using vec3b function

We want to obtain the pixel value of an image:

Let us consider a 3 channel image of BGR color ordering
(The BGR color ordering is the default order returned  by imread)
Here the order of the channel is reverse

(We generally use RGB color model while describing about an image.In BGR the color model is same except the order of the channel is reverse)

1. The code for reading value of the pixel at the co-ordinates(x,y)
Vec3b imagepixel = image.at(x,y);
/*Reading the pixel value of an image at a particular location*/
#include <opencv2/core/core.hpp>  
#include <opencv2/highgui/highgui.hpp>  
#include <iostream> 

  using namespace std;  
  using namespace cv;  

int main() 
  {  
    Mat image; 
 //Reading the color image 
    image = imread("C:\\Users\\arjun\\Desktop\\image003.png", CV_LOAD_IMAGE_COLOR);  

  if (!image.data)             //If image not found                                                             
     {  
      cout << "No image data \n";  
      return -1;  
     } 
       Vec3b imagepixel = image.at<Vec3b>(250,500); //Reading pixel value at location (i,j)
    cout<<"imagepixel(BGR)="<<imagepixel<<"\n" ; //Displaying the pixel value  
       
        namedWindow("Display Image");               //Display the original image
  imshow("Display Image", image);  
  waitKey(0);
  return 0;
      }

Here is the link of the code for accessing the value of the image at a point:

_____________________________________________________
Output:

output-accessing-pixel-value-at-coordinate

______________________________________________________
Image:

original-image-opencv

_____________________________________________________

2. Code for dynamically entering the co-ordinates of the image by the user:


/*Reading the pixel value of an image at a particular location*/


#include <opencv2/core/core.hpp>  
#include <opencv2/highgui/highgui.hpp>  
#include <iostream> 

  using namespace std;  
  using namespace cv;  

int main() 
  {  
    Mat image; 
 //Reading the color image 
    image = imread("C:\\Users\\arjun\\Desktop\\image003.png", CV_LOAD_IMAGE_COLOR);  

 //If image not found  
       if (!image.data)                                                             
     {  
      cout << "No image data \n";  
      return -1;  
     } 


    while(1)
  {
     //Taking inputs from the user for the co-ordinates of the image 
     int i,j;
     cout<<"Enter the co-ordinates of the image where you want to find the pixel value (i,j): \n";
  cout<<"i<"<<image.rows<<"\t"<<"&"<<"\t"<<"j<"<<image.cols<<"\n";
     
  cout<<"i= ";  cin>>i;
     cout<<"j= ";  cin>>j;
    
  if(i < image.rows) 
    { 
            if(j < image.cols)
   {
           //Reading pixel value at location (i,j)
              Vec3b imagepixel = image.at<Vec3b>(i,j); 
           //Displaying the pixel value                                                        
              cout<<"imagepixel(BGR)="<<imagepixel<<"\n" ;
          }  
        }
      else
        { 
      cout<<"Image Co-ordinates value out of range \n"; 
        }

      }
        return 0; 
      }

__________________________________________________________

Here is the link of the code for accessing dynamically pixel value of the image:
 _________________________________________________________
Output:
code-dynamic-access-pixel-value-output-image-opencv

__________________________________________________________
 Image:
original-image-opencv

___________________________________________________________

3. 
Code for accessing the full pixel value of an image just by using cout function:

Here we have used cout;
See the difference between Code 3. and Code4.
Code:
/*Displaying the Pixel value of the whole Image*/
#include <opencv2/core/core.hpp>  
#include <opencv2/highgui/highgui.hpp>  
#include <iostream> 

  using namespace std;  
  using namespace cv;  

int main() 
  {  
    Mat image; 
 //Reading the color image 
    image = imread("C:\\Users\\arjun\\Desktop\\image003.png", CV_LOAD_IMAGE_COLOR);  

  if (!image.data)             //If image not found                                                             
     {  
      cout << "No image data \n";  
      return -1;  
     } 
    cout<<image ;              //Displaying the pixel value  of the whole image
    namedWindow("Display Image");               //Display the original image
    imshow("Display Image", image);  
    waitKey(0);
    return 0;
      }
  
___________________________________________________

Here is the link of the code below:
_______________________________________________________________
 Output:

code-pixel-value-of-full-image-cout-output-opencv

___________________________________________________
4. Code for accessing the full pixel value of an image just by using for loop and Vec3b function:
/*Displaying the Pixel value of the whole Image using Loops*/

#include <opencv2/core/core.hpp>  
#include <opencv2/highgui/highgui.hpp>  
#include <iostream> 

  using namespace std;  
  using namespace cv;  

int main() 
  {  
    Mat image; 
 //Reading the color image 
    image = imread("C:\\Users\\arjun\\Desktop\\image003.png", CV_LOAD_IMAGE_COLOR);  

 //If image not found 
 if (!image.data)                                                                          
     {  
      cout << "No image data \n";  
      return -1;  
     } 


 //for loop for counting the number of rows and columns and displaying the pixel value at each point
   for (int i = 0; i < image.rows; i++) 
   { 
      for (int j = 0; j < image.cols; j++) 
    { 
         Vec3b imagepixel = image.at<Vec3b>(i, j);
      cout<<imagepixel ;   //Displaying the pixel value  of the whole image
     } 
   }
     namedWindow("Display Image");               //Display the original image
     imshow("Display Image", image);  
      waitKey(0);
      return 0;
        }


Here we have used for loops along with Vec3b to display the pixel value at each row and column.
_____________________________________________________
Output:
code-pixel-value-of-full-image-for-loop-vec3b-function-output-opencv


____________________________________________________

Here is the link of the code:
____________________________________________________
Note the difference in the output of the two codes.
In the output of the 4th code all the pixel values are represented in BGR format as [ B,G,R] e.g [0,0,255].