We want
to obtain the pixel value of an image:
Let us consider a 3 channel image of BGR color
ordering
(The BGR color ordering is the default order
returned by imread)
Here the order of the channel is reverse
(We generally use RGB color model while
describing about an image.In BGR the color model is same except the order of
the channel is reverse)
1. The code for reading value of the pixel at the
co-ordinates(x,y)
Vec3b imagepixel = image.at(x,y);
/*Reading the pixel value of an image at a particular location*/
#include <opencv2/core/core.hpp>
#include <opencv2/highgui/highgui.hpp>
#include <iostream>

  using namespace std;
  using namespace cv;

int main()
  {
    Mat image;
 //Reading the color image
    image = imread("C:\\Users\\arjun\\Desktop\\image003.png", CV_LOAD_IMAGE_COLOR);

  if (!image.data)             //If image not found
     {
      cout << "No image data \n";
      return -1;
     }
       Vec3b imagepixel = image.at<Vec3b>(250,500); //Reading pixel value at location (i,j)
    cout<<"imagepixel(BGR)="<<imagepixel<<"\n" ; //Displaying the pixel value

        namedWindow("Display Image");               //Display the original image
  imshow("Display Image", image);
  waitKey(0);
  return 0;
      }
Here is the link of the code for accessing the value of the image
at a point:
_____________________________________________________
Output:

______________________________________________________
Image:

_____________________________________________________
2. Code for dynamically entering the co-ordinates of the
image by the user:
/*Reading the pixel value of an image at a particular location*/


#include <opencv2/core/core.hpp>
#include <opencv2/highgui/highgui.hpp>
#include <iostream>

  using namespace std;
  using namespace cv;

int main()
  {
    Mat image;
 //Reading the color image
    image = imread("C:\\Users\\arjun\\Desktop\\image003.png", CV_LOAD_IMAGE_COLOR);

 //If image not found
       if (!image.data)
     {
      cout << "No image data \n";
      return -1;
     }


    while(1)
  {
     //Taking inputs from the user for the co-ordinates of the image
     int i,j;
     cout<<"Enter the co-ordinates of the image where you want to find the pixel value (i,j): \n";
  cout<<"i<"<<image.rows<<"\t"<<"&"<<"\t"<<"j<"<<image.cols<<"\n";

  cout<<"i= ";  cin>>i;
     cout<<"j= ";  cin>>j;

  if(i < image.rows)
    {
            if(j < image.cols)
   {
           //Reading pixel value at location (i,j)
              Vec3b imagepixel = image.at<Vec3b>(i,j);
           //Displaying the pixel value
              cout<<"imagepixel(BGR)="<<imagepixel<<"\n" ;
          }
        }
      else
        {
      cout<<"Image Co-ordinates value out of range \n";
        }

      }
        return 0;
      }
__________________________________________________________
Here is the link of the code for accessing dynamically pixel value
of the image:
_________________________________________________________
Output:

__________________________________________________________
Image:

___________________________________________________________
3. Code for accessing the full pixel value of an image just by using cout function:
Here we have used cout;
See the difference between Code 3. and Code4.
Code:
/*Displaying the Pixel value of the whole Image*/
#include <opencv2/core/core.hpp>
#include <opencv2/highgui/highgui.hpp>
#include <iostream>

  using namespace std;
  using namespace cv;

int main()
  {
    Mat image;
 //Reading the color image
    image = imread("C:\\Users\\arjun\\Desktop\\image003.png", CV_LOAD_IMAGE_COLOR);

  if (!image.data)             //If image not found
     {
      cout << "No image data \n";
      return -1;
     }
    cout<<image ;              //Displaying the pixel value  of the whole image
    namedWindow("Display Image");               //Display the original image
    imshow("Display Image", image);
    waitKey(0);
    return 0;
      }
___________________________________________________
Here is the link of the code below:
_______________________________________________________________
Output:

___________________________________________________
4. Code for accessing the full pixel value of an image
just by using for loop and Vec3b function:
/*Displaying the Pixel value of the whole Image using Loops*/

#include <opencv2/core/core.hpp>
#include <opencv2/highgui/highgui.hpp>
#include <iostream>

  using namespace std;
  using namespace cv;

int main()
  {
    Mat image;
 //Reading the color image
    image = imread("C:\\Users\\arjun\\Desktop\\image003.png", CV_LOAD_IMAGE_COLOR);

 //If image not found
 if (!image.data)
     {
      cout << "No image data \n";
      return -1;
     }


 //for loop for counting the number of rows and columns and displaying the pixel value at each point
   for (int i = 0; i < image.rows; i++)
   {
      for (int j = 0; j < image.cols; j++)
    {
         Vec3b imagepixel = image.at<Vec3b>(i, j);
      cout<<imagepixel ;   //Displaying the pixel value  of the whole image
     }
   }
     namedWindow("Display Image");               //Display the original image
     imshow("Display Image", image);
      waitKey(0);
      return 0;
        }
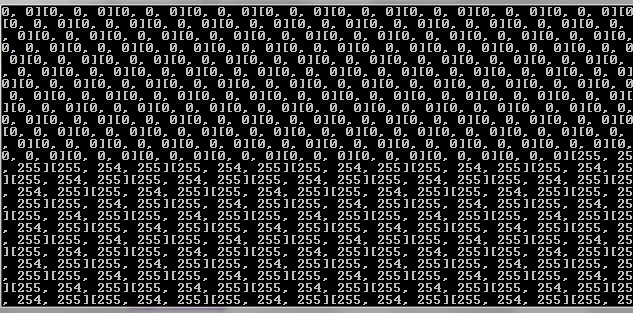
Here we have used for loops along with Vec3b to display the pixel
value at each row and column.
_____________________________________________________
Output:
____________________________________________________
Here is the link of the code:
____________________________________________________
Note the difference in the output of the two codes.
In the output of the 4th
code all the pixel values are represented in BGR format as [ B,G,R] e.g
[0,0,255].


